FREE WORK-ITEM EDITOR

Better Editor

Make every work item easier to understand.

Write clear descriptions, highlight decisions, and organize acceptance criteria with a modern toolbar inside Azure DevOps.

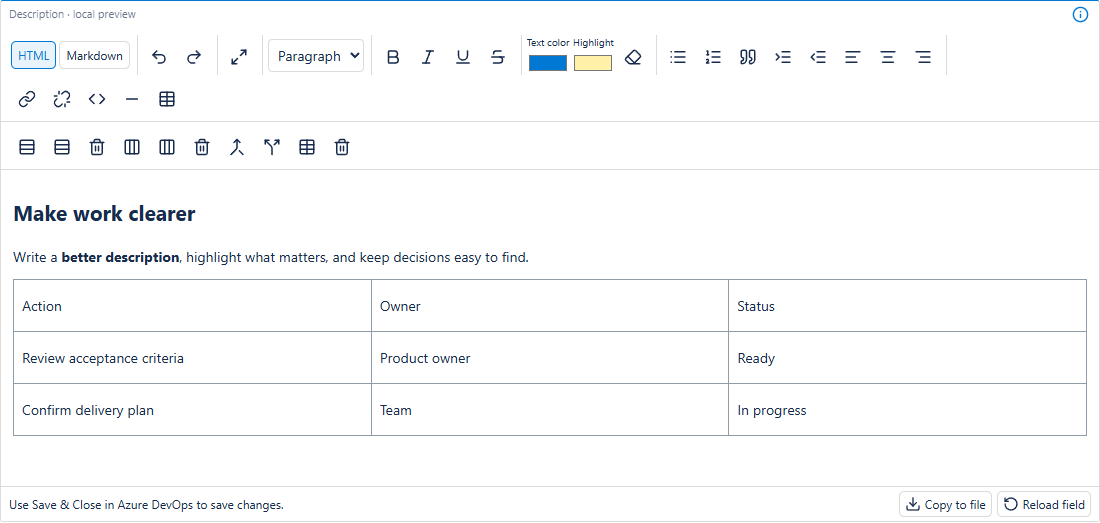
Better Editor HTML toolbar with text formatting, table controls, and an action table
HTML editing with an action table. Example content from the local preview.

PUT IT TO WORK

Three ways to use Better Editor

Illustrative examples to help you choose the right workflow for your team.

01

Write acceptance criteria

Give reviewers a clear definition of done.

Checkout confirmation

Required for release

  • Show the order number after payment.
  • Send a confirmation email.
  • Keep the receipt available for download.

Use headings and lists in HTML mode, then select important text and apply a highlight. Save the work item with Azure DevOps Save or Save & Close.

02

Keep review actions together

Use a table when ownership and status matter.

Release readiness review
ActionOwnerStatus
Review criteriaProduct ownerReady
Confirm rolloutDelivery teamIn progress

Insert a table in HTML mode. Put the cursor in a cell to add or delete rows and columns, merge or split cells, or toggle the header row.

03

Draft in standard Markdown

Keep text-focused work easy to scan and edit.

## Release summary

**Added:** order confirmation.

- Show the order number
- Send a confirmation email

[Design notes](https://example.com)

Switch to Markdown for CommonMark source and preview. Its toolbar matches the format; colors, highlights and tables stay in HTML mode. Review the conversion warning before switching rich content.

GET STARTED

Set up in Azure DevOps

One control edits one configured HTML field. Installation does not automatically replace every editor. Open full page gives you a larger workspace with the work-item ID and title; keep the original tab open and save the work item there.

Read the complete guide →
  1. Open Organization settings > Process and select your inherited process and work-item type.
  2. On Layout, add a custom control and choose Better Editor. Create a new rich-text field first if you need one.
  3. In Options, choose the existing rich-text field, then set the label, page and group.
  4. Open a work item, edit the content, and use the native Save or Save & Close button.

← Explore all Additional Tools